Maud Humphrey

Maud Humphrey

Tuesday, November 26, 2019

18" Madame Alexander Doll Head Repair


After my last post describing how I go about repairing a broken limb on a Journey Girl, it reminded me that I still hadn't posted about how I fix broken heads on these shoulder plate dolls.  So here you go.  This is a pretty little gal I picked up at the thrift store strictly because I liked her clothing.  Getting a complete outfit, plus shoes for only $3.00 seemed like a pretty good deal!  I figured I could keep the clothing and donate the doll back to the thrift store, but only after I fixed her wobbly head.

Her stuffing had also settled in such a way to where she couldn't stand up straight, poor thing.

First order of business:  open back seam and pull out all the stuffing.  Set aside.

Using sharp scissors, pull the head away from the neck and clip the stringing elastic.

Pictured here is the plastic cup that was up inside her head.  Use a blow dryer to heat the vinyl for a few minutes so that it becomes pliable enough so you can pull out the cup with a pair of pliers.  Thread with new stringing elastic and attach a crimping sleeve to the end as shown.  Now, shove this cup back up into the head, extending the long, loose end of the stringing elastic through the neck and into the body cavity.

Now, this is where the fun part begins:  string the cup hook that was in the body, followed by a couple of wooden spools (or however many you need), and then another crimping sleeve.  Pull everything nice and tight up against the neck cavity.  The reason you need the wooden spools is because the body cavity is too small to effectively reach up with a pair of pliers and squish the crimping sleeve, so adding the spools give you more room to work.  I have heard from people who have actually tightened these dolls' heads without stringing on extra length in the form of spools like I have, but they have also said that it was one of the hardest things they ever did and many curse words may have been uttered!

After you have pulled the stringing cord as tight as you can, squish flat the crimping sleeve at the base of the wooden spool.  Re-stuff the body.  I added extra stuffing I had on hand so she could stand without slouching.  Stitch up the back seam.

And here she is, good as new!  Her head is nice and tight again, and she can stand on her own without looking like she's crippled.  Easy peasy.  I suppose this would work with most 18" dolls with shoulder plates, although the Journey Girl doll I worked on in the last post had a bottom plate in her chest area, so this would have needed to be cut out first in order to access the head.  Hope this works for you!


Friday, November 1, 2019

Journey Girls Doll Arm Repair

I found this cutie at Goodwill this past week.  I have always loved the Journey Girl faces.  I think they are some of the prettiest dolls in the 18" catagory.

Plus, ever since Toys R Us went out of business, it's hard to say how long they will be in production.  I know you can still buy them on Amazon, but for how long?  So whenever I find one I snap it up and try to bring her back to her former glory.  I'm a sucker for rehab projects.  I know I spend way more time and effort than the doll is probably worth, but it's FUN.  Especially when I get good results!

So, I didn't think this girl was going to need much help at all.  Maybe just a trip to the hair salon and a pretty new dress.  But then I was repositioning her arms and I heard a weird "click", and the next thing I knew, her arm was no longer connected to her body.

Poor Callie!

I have read a lot recently that the newer Journey Girls all seem to have this problem--joints that are stiff, hard to move, and easily broken.  How disappointing for a young child this would be!  So now my "easy" rehab suddenly became a little more difficult.  But not to worry.  I've restrung many a doll, so how hard could it be?

Hard.  What the heck even is this kind of joint?!?

This is the part that was inside the arm.  There used to be a peg attached that sort of swiveled and was attached to that weird contraption inside her shoulder cavity.  I used a hair dryer to soften the vinyl for a few minutes and then popped it out.

This is the intact joint from the good arm.  I decided to remove it too, since I didn't want to leave one arm with the potential of breaking in the future.

I don't have a picture of how I removed the weird plastic grid-like thing from the inside of her shoulder cavity.  But I basically heated up the vinyl and pulled it out with some pliers.  And then promptly threw it into the garbage.

But then I encountered this...the cavity is sealed up to the inside of her body!  What?!?  So in order to restring her the way I had planned, I would need to cut out the solid piece on both sides.  I heated the vinyl again, and used my Xacto knife to cut out a sloppy circle from each side.


Close up:

Here you can look through to the other side:
So here is where I figured it would be easy.  I would simply restring her like I have other dolls in the past, with my little wooden craft wheels, stringing cord, and brass sleeve crimpers.

Here I am, testing out to make sure the wooden wheel will fit inside the hole.  It did.

Here's the other wheel, strung with cord and ready to be inserted inside of the arm.
It was at this point that I realized that my hands were too big too be able to fit into such a tiny space, so I figured I'd have to open up her back seam and come in through her body in order to tighten the cords and crimp them (like you would do with an American Girl doll.  But guess what?  Her shoulder plate is completely sealed off with solid plastic!  That's right!  You can open up her back seam and start pulling out the stuffing, but then you run into the solid vinyl of the bottom of her shoulder plate.  Seriously?!?  What were the makers of these dolls thinking?  Could they have made it any more difficult?!?  I think not.

But not one to give up easily (my husband says I may be just a little bit stubborn!), I started thinking of another way I could reattach her arms.  And then it came to me...use some sort of discs where I could run a single piece of cord from one arm, through the body, through the other arm, and back to the first arm where I would tie it off.  Just like I do with most of my antique doll restorations.  But what could I use for the disc?

Buttons!

But not just any buttons...I came to the conclusion that they needed to be shank-style buttons with a large enough hole so that my stringing cord could fit through the shank with ease.  So off to JoAnn's I went.

I determined that they need to be about a 1 1/8" in diameter in order to fit nicely in the arm hole.  But not all of the buttons I found in that size had shanks with a big enough hole to accommodate my stringing cord.  Then I happened across these clock buttons.  $5 for a pack of 8, but with my 50% off coupon, they were only $2.50!  So a little over 31 cents apiece.  Not bad!  But would they work like I had envisioned?

Once again I used my trusty blow dryer to heat the vinyl.  Then I shoved the button, shank side up with cord already strung through, into the arm.

I pulled the cord ends through the body with my hemostat, strung one end onto another button, and shoved that button into the other arm.

Next, I tied both ends of cord together and pulled them as tight as I could.  I tied them in a triple knot and shoved the cord ends inside the body.


And voila!  Callie has arms again!  And they work!

They hold position perfectly.  Which begs the question...why couldn't the manufacturers of these dolls joint them this way in the first place?!?  Save all that plastic?  Ah, well.  All's well that ends well!  Or something like that.  And I feel proud and satisfied that I wa
s able to figure out another doll repair dilemma.  My great hope is that this might help out others who find themselves in the same situation.  So now she just needs a new dress and she'll be ready to go on to a new home!

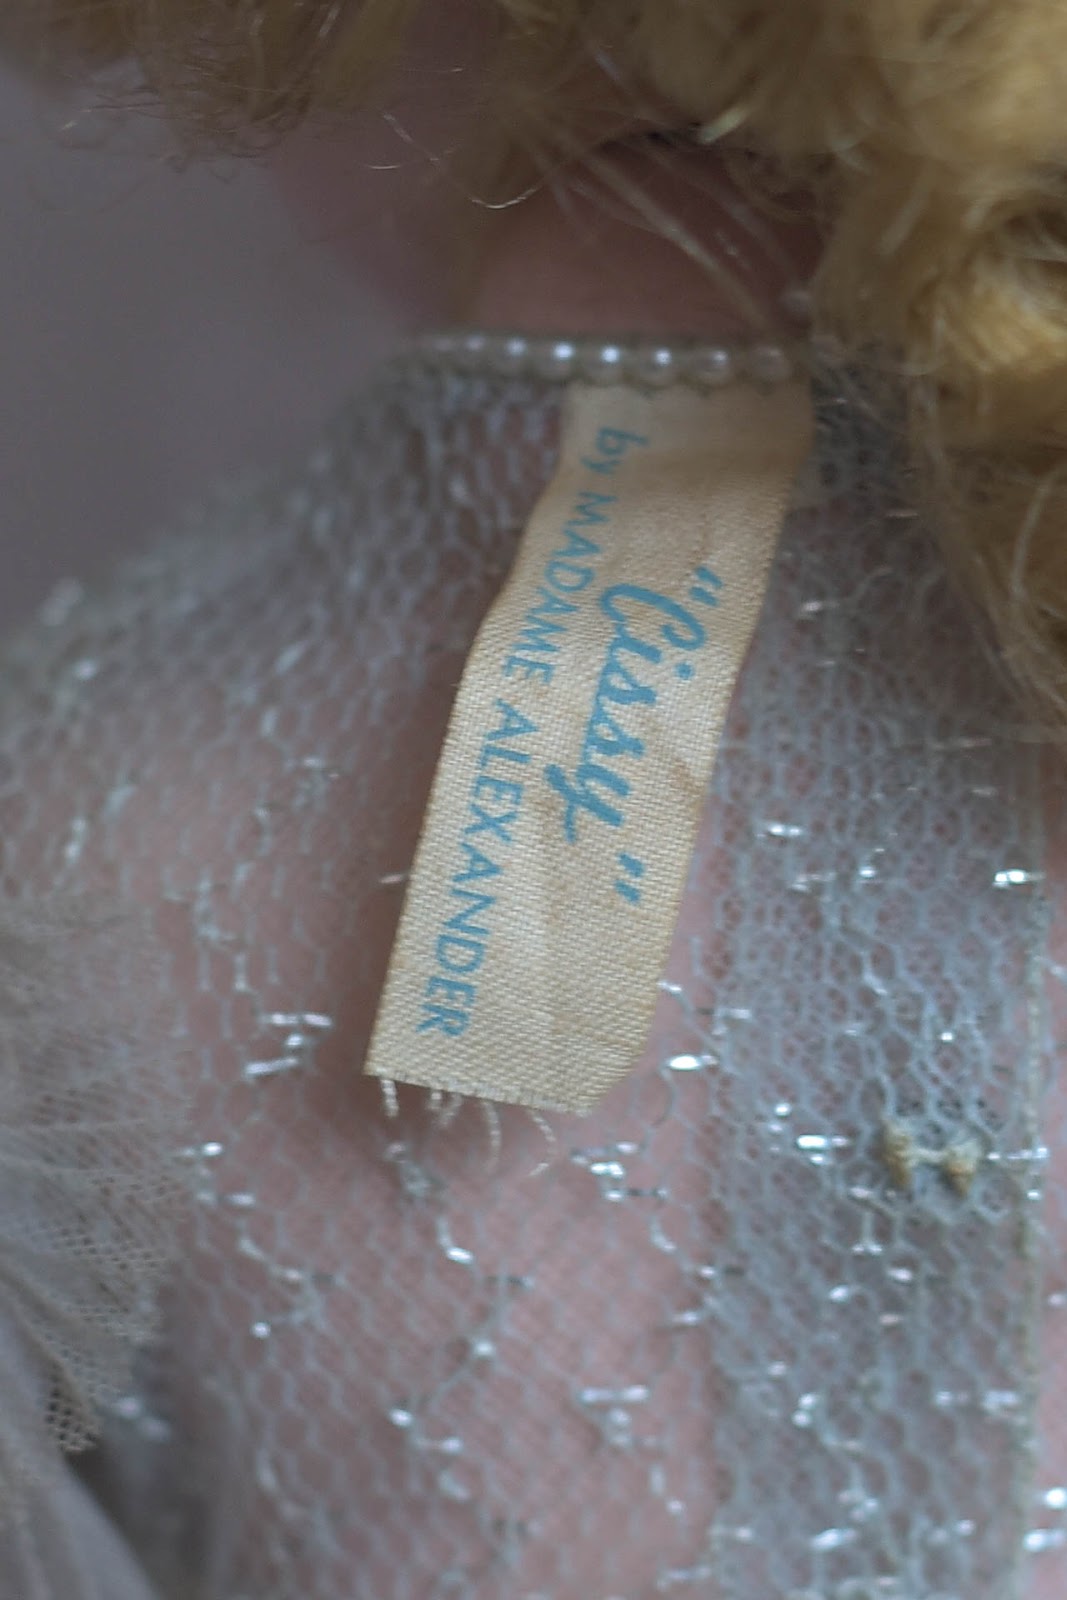
In case you read my last post about the vintage Cissy doll I found, this is a rather disgusting picture of the black-ish water in the tub AFTER I rinsed her clothes in Oxy Clean all night.  Gross, right?  I can't believe how much dirt came out of her dress.


Before soaking it, I ran a basting thread all around the top of her skirt in order to keep all of the tiny pleats in place.  I didn't want them coming out in the wash and then have to try ironing them all back in!  Just in case you've forgotten, this is what her dress looked like before I washed it:


And here it is after!  It definitely looks much cleaner and fresher while standing up on a towel to dry.  I did notice that the tulle netting of this dress has some rips and chunks missing from along the hemline, but since it is such a full dress, it is not easily noticeable.  Now I'm trying to decide what I want to do about that...do I just leave it alone, or do I try to repair it somehow?  Is it even possible to find a tulle netting in the same shade and weight?  If so, I could make a ruffle and gather it to the lower portion of the skirt, disguising the problems underneath.  I just don't know.  I will leave it alone for now.  Currently, Cissy has her darkened arm slathered up in 10% benzoyl peroxide zit cream and is lying under my bedside lamp, in hopes of lightening up her vinyl.  I will also look for a make-up brush with some soft bristles in the same color as her eyelashes so I can replace the missing ones on her right eye.  I'll keep you posted on my progress!


Monday, October 28, 2019

Vintage Madame Alexander CISSY Doll, or Why it Pays to Take Your 10 year old Shopping with You!

Pickings at our local Goodwills have been kind of slim lately.  The only dolls I've been able to find in vast abundance seem to be Cabbage Patch, Disney Princesses, and 18" dolls from Target and Walmart.  I hold my breath every week upon entering my favorite Goodwill, the one that has the best toy aisle and where I've found the best dolls.  I'm always hopeful that this will be the time I discover that awesome find!  But more often than not, I've been walking out of the store with one or two mediocre dolls, or maybe even nothing.  Until this week!

Right now, this is my favorite child.  Haha!  Just kidding.  But that's what I told her when she returned to me in the Goodwill toy aisle after walking around the store with her brother to look at other things.  They get kind of bored, waiting for me to paw through ALL of the toy shelves, just in case something might be hiding.  I had discovered one Journey Girl and two, vintage, Madame Alexander babies, but that was it.  And then here comes my daughter, holding out a large doll in my direction.  "Here, Mom," she says.  "Do you want this?  It was in one of the carts they just rolled out to put away on the shelves."

This is what she handed me:
I might have squealed, just a little.  It's a Madame Alexander CISSY, people!  A vintage one, from the 50's, in her original, tagged dress!  She even has her matching headpiece, underwear, and stockings!  No shoes, but I'm not quibbling about that!

I've never held one in person before.  I'm sure they've been at doll shows, but since this isn't really the type of doll I collect, I've probably walked right by.  But I've read articles about her lately, and seen the huge following she seems to have.  So as soon as I saw her, I knew what she was!

She is missing some eyelashes from her right eye, and her right arm is dirty and discolored.  Her dress is also pretty filthy.  But besides that, she is in wonderful condition.  Her hair is very pretty and in it's original set.


She still has the ring on her finger!

Poor, discolored arm.  I will try to clean it and see what I can do about lightening it.  Somebody said that this is a result of being exposed to harsh lighting.  I will try coating it with 10% benzoyl peroxide zit cream and see what happens.  It usually takes out ink stains from vinyl dolls very well, so maybe it'll work for this, too.

Tag at back neckline

Back view of her gorgeous gown
I think the original color was an aqua blue, but it has faded and become quite dingy with grime.

Her underwear elastic has stretched out

Here you can really see her discolored arm compared to the rest of her body

Still, I think she's in really good shape, considering her age!  She has extra joints at the elbows and knees.  I think she's some sort of "walker", because when you move one leg, the other one moves in the opposite direction.

I asked questions about her on a Cissy Facebook group (there's a group for just about everyone and everything on Facebook!).  I was told that she is a "1956 Fashion Parade", #2030, wearing a bridesmaid gown of pleated tulle and netting.  

I have so much to learn about these dolls!  At first, I was thinking about selling her, but now I'm not so sure.  She's growing on me!  And her clothing...oh my!  She had quite the wardrobe!  I've seen patterns for her, and I think it'd be so fun to make her 50's style clothing...one of my favorite eras.

The best thing about this find...just look at the price tag:
Yes, $5.00!

I find it hysterical that Goodwill prices their "Collector Porcelain Dolls" usually twice as expensive, and yet they are barely worth anything.  In fact, I usually just buy them for parts (wig, shoes, eyes, etc) when they are half off.  But this doll, worth so much more on the secondary market among collectors, was only deemed worthy of a $5 price tag.  Don't worry, Cissy, I will make you beautiful again!  

The moral of this story:  never underestimate the power of your 10 year old to seek out and recognize vintage dolls that may be of interest to you.  I have taught her well!


Thursday, September 5, 2019

Pleasant Company Kirsten and a New Outfit!

A few years ago, I sold both my Addy and Kirsten American Girl dolls.  I had bought them second hand, they weren't in the best condition, and I never really "bonded" with them.  So I didn't think they needed to take up space in my collection, and I didn't think I'd miss them
.  Lately though, I've been regretting my decision and really wanting them back!  So I found the Addy in my one of my Facebook groups, and just a few short days later, I found Kirsten on Facebook Marketplace!

Isn't she pretty?

I bought her from her original owner who had tears in her eyes when she handed her over to me.  She had many, lovely memories of playing with her as an older child, and took such good care of her.  She is in immaculate condition.  Her hair was still in it's original braids.  Her limbs are tight, her body clean.  Just perfect!

She came with her original dress and two other, original outfits.  But I still felt the need to make something "just for her".

I made her this pretty dress with a dainty, striped print and a sheer, cotton apron.

The apron is Simplicity 1391 again.  The fabric is a sheer cotton with a "windowpane" design woven in.  I added a strip of vintage, insertion lace on the bodice, and also along the hemline.  This pattern went together very quickly and has nice details, like the flanges along the shoulders.

It simply ties in the back.

The dress is my own design.  I studied lots of antique photos of little girls' fashions from the 1850's, and discovered that there were a lot of options:  high necklines, wide necklines, and even off-the-shoulder necklines.  Long sleeves, short sleeves.  Gathered bodices, plain bodices.  So this is my interpretation--a gathered midriff, short sleeves, wide neckline, and a very, full skirt.

I added a bias strip of the fabric at the hemline to add some visual interest.  It is trimmed in a sweet, picot-edge bias tape.

The bodice also has piping at the upper bodice and waistband.

Back view

I couldn't leave well enough alone, and just HAD to undo her original braids!  Then I couldn't put them back again to look the same.  So I invented a new hairstyle for her which I think turned out adorable!  I lightly French-braided down the sides, finished braiding all the way down to the ends, and then looped each braid across the back of her head to the opposite side and secured it with a bow.

This doll is most likely from around 1995, based on her short, body tag (which states Pleasant Company 1986, made in Germany), and the Pleasant Company marking on the back of her neck.  I would love to own a white body Kirsten someday, but until then, I just love my pretty, new Kirsten!