Maud Humphrey

Maud Humphrey

Friday, February 6, 2015

Show and Tell: American Character TINY TEARS

I am many things...a wife, a mother, a daughter, a sister...but I'm also a doll collector.  I love dolls!  I can't remember a time ever NOT loving them.  I have been collecting them for years, so I figured maybe I should start "showing and telling" what has tickled my fancy.  Here we go:
 
This little sweetie is Tiny Tears, made by the American Character Doll Co. from 1950 and on.  There are still versions of Tiny Tears being made today!  The very earliest ones had hard plastic heads on jointed rubber bodies.  The next models had hard plastic heads on vinyl bodies.  After that, both the heads and bodies were made from vinyl.  My 11 1/2" example is the smallest size made (I think) and is one of the earliest versions with the all rubber body.
What made Tiny Tears unique and one of the most popular baby dolls of the 1950's was the fact that she could cry real tears and blow bubbles!  Really!  See those two holes on either side of the bridge of her nose?  A little mother simply fed her baby some water with a bottle, and then when she squeezed Tiny's tummy, tears would exit the holes!  Tiny Tears also came with a plastic pipe that one could fill with soapy water; again, if her tummy was squeezed while the pipe was in her mouth, bubbles would come out!
An early advertisement for Tiny Tears
 
I bought my Tiny Tears at an estate sale from the lady who had owned her as a child.  The estate sale was for her mother, who had gone to live in a nursing home because she had advanced Alzheimer's.  The daughter was trying to get rid of all of her mother's vast doll collection, and I found Tiny Tears among hundreds of Barbies.  She came with several, home made outfits, in addition to her original pink & white dress and bonnet.  Here she's wearing a little pink sweater crocheted just for her by the original owner's grandmother.  I don't think this is her original bottle, but it's definitely of her era, with a rubber nipple on a glass bottle.
 
Home made, flannel diaper shirt
 
Home made, one piece romper.  Tiny Tears sometimes came in a commercially made romper just like this, but it would have had "Tiny Tears" embroidered across the front.  After looking at other pictures online, I realize that I put this romper on backwards!  There are ribbons at the sides which I tied in the back, but they are supposed to tie in the front.  I'll get it right next time!
 
Another handmade item--a sweet, yellow, flannel coat and bonnet.
 
Isn't she adorable?  I remember talking to the original owner, and asking her why she was selling this doll, when it was obviously a favorite plaything, not to mention that her mother had made all the extra clothing.  She just shrugged and said that she had kept what she wanted, and this one needed to go.  I felt so sad!  I just don't think I could get rid of anything that my mother had made for me as a child.  Then again, maybe I'm too sentimental?  In any case, I'm glad she found her way into my collection.  She really is a cutie and I smile whenever I look at her.


Tuesday, February 3, 2015

A New Dress for an Old China Head

 
Recently, a friend from my doll club asked if I could make a dress for her antique, china head doll.  This is what she wanted me to use:
 
It appeared to be a vintage baby/toddler dress.  The material was a soft, loosely woven, homespun-type fabric in a delicious shade of peach that beautifully set off the doll's coloring.  I can see why my friend wanted it.  However, once I started on the project, I began to wonder what I had gotten myself into.  Notice how the dress is sleeveless?  Cute for a baby, but not so appropriate for a late, 1800's style dress.
 
I placed the dress over the doll, just to get an idea of what I might need to do in order to make it fit.  I knew for sure that it would need sleeves, but how was I going to make those when I didn't have much fabric to work with?  I wanted to leave the bodice as it was, and gather the bottom of it to a waistband, which was a popular dress style for these dolls.  I started by cutting the skirt from the bodice.  Then, I removed the lace from the armhole openings and cut in armhole curves from the bodice.  I discovered that there was quite a deep hem at the bottom of the skirt, so I decided to let it out. (It ended up being 4-5 inches in width)  This still wasn't wide enough from which to cut sleeves, but I could use this extra fabric for the waistband and trim on the sleeves.  Luckily, I ended up finding some cream colored, vintage fabric in my stash that worked perfectly for the sleeves.
 
After several hours of picking out seams and carefully planning how I was going to make this work, here is what I came up with!  I was pretty proud of myself when it was all said and done.
 
I realize this photo isn't completely in focus, but it's the only one I took of the detail on the sleeves.  Since I didn't want it to look like the sleeves were an afterthought, I added a strip of the dress fabric and the lace I removed from the armholes.  I think this helps tie the sleeves to the dress.
 
A closer view of the bodice.  Isn't this doll just gorgeous?  I forgot to measure her, but I think she was around 28" long.  Not sure of her maker, but probably Kestner or ABG.
 
Back view--the buttons and buttonholes were already there, so all I had to do was add a snap at the waist.
 
I took this little beauty to my friend today when we met for doll club.  She was thrilled with how it had turned out.  I was sad to see her go, but someday, I hope to own a beautiful china like this, also!


Sunday, February 1, 2015

How to Make a Doll Cardigan Without Actually Knitting or Crocheting!

I love sweaters and cardigans.  It was one of my favorite pieces of clothing to put on my babies.  It is the one clothing essential I am always on the lookout for myself when I am at the thrift shops.  So it only seems logical that I would want my dollies dressed in them also!  Well, I can knit and crochet, and while I enjoy it, I love sewing more.  There are only so many hours in a day, after all!  So I recently figured out how to "make" cardigans for my 18" crowd, without actually having to dig out my knitting needles or crochet hooks:
Voila!  Isn't this adorable?
 
A closer view
 
And the back...
 
So, how did I make this?  BABY sweaters, people!  I went to Value Village a couple of days ago and picked up this little size 0-3 month cardigan for $1.00.  It was regularly priced at $1.99, but it had the color tag that was 1/2 price that week.  Score!  I made a simple pattern of a front, back, and sleeves, loosely based on the measurements of Kit's Meet sweater.  I placed these pattern pieces on the baby sweater, utilizing the cuffs so that I wouldn't have to hem anything.  I also used the placket and buttonholes.  I didn't take any pictures.  But today, I made another one, and I took photos throughout the process.  So here you go, just in case you, too, want to outfit one of your dollies in a thrifted sweater cut down to just her size:
 
I started with this cute, striped cardigan from Baby Gap.  It cost me all of $2.00 at a local children's clothing resale shop.
 
I folded it in half, so that the front edges were perfectly lined up, and then I pinned on the pattern for the cardigan front.  Notice how I am incorporating both the bottom and front edges.
 
The front pieces, cut out.
 
Cutting out the back pattern piece on the fold of the back of the cardigan.  Notice again that I am using the bottom edge of the cardigan.
 
Next, I cut off the sleeves, folded them in half, and pinned on my pattern piece, again using the scalloped edge of the sleeves along the bottom of my pattern piece.
 
The cut up remnants of the baby cardigan.
 
All cut out and ready to be sewn...
 
First step:  Sew the fronts to the back at the shoulders.
 
Sew sleeves to the armholes, and then stitch the sides and underarm seams.  I finish all my seams with a zig zag stitch.  Be careful not to stretch out the neckline.
 
Next, I decided where I would need to add more buttonholes.  Sometimes, if you're lucky, the buttons might be spaced just right and you won't need to add extras.  But this hasn't been the case for me yet.  I also discovered (after making the first cardigan) that it's easier to stitch the buttonholes BEFORE you attach the neck binding because of the extra bulk there will be at the neckline after you attach the binding.  In the above photo, you can see that I added two more buttonholes:  one at the top and another between the last two buttons.
 
The only edge which is raw and will need to be finished somehow is the neckline.  I cut a bias strip from some pretty fabric that matched the cardigan, 1 1/2" wide by 8" long.  I folded in each short edge 1/4", and then folded the entire strip in half, lengthwise.  Press well.
 
Here is the binding, pinned to the neckline.
 
And here it is again, after I stitched it to the neckline.  I also zig-zagged the edges, though I probably didn't need to because it won't be seen.  However, I wanted to make sure this seam was nice and sturdy with no chance of unraveling in the future.
 
I folded the binding to the inside and hand stitched it into place.
 
And here is Kit, modeling her new cardigan!
 
I sewed the remaining two buttons from the baby cardigan into place where I had made the new buttonholes.
 
Back view
 
This was really such a quick, simple project.  I am really pleased with how well it turned out!  I am already envisioning many more cardigans--I'd like to try some with zippered fronts and maybe make a hooded version if there is enough leftover fabric.  Some other details that might be of importance:  I used a regular needle and a regular straight stitch on my machine.  I did lengthen the stitch from 2.5 to 3.0.   As stated previously, I finished all my edges with a zig zag stitch.
 
Wow, I almost forgot to mention...I got a NEW SEWING MACHINE!  The super-nice sewing machine repair man called last week to say that my machine had died a sad death, and there was no saving her.  Her circuit board had fried.   I almost cried.  On the plus side, it was nothing I had done to cause her untimely demise.  He stated that these new machines are only built to last about 10-15 years, (I had mine for 11) and that with as much as I sew, I had really received my money's worth.  After the initial shock that I wasn't getting her back, I asked the repair man what brand machine he recommended, and he said Pfaff.  My old machine many years ago was a Pfaff, and the machine I was currently using as a back up is also a Pfaff.  He said they are the "workhorses" of the sewing machine world.  So my wonderful husband took me in the next day to check them out, and I ended up walking out with a brand new Pfaff Ambition, 1.0.  I love it, though I still have lots to learn.  I suppose I should haul out the manual and get familiar with it!
 
Oh, and one more thing:  I don't think you need to limit yourself to just baby cardigans.  Adult sweaters would work just as well, as long as the cuffs aren't too wide to be out of scale for a doll, and the knit isn't too chunky.  So, there you go.  Easy cardigans for your dolls.  Now, run out to the thrift stores and try your hand at making one (or two or three!)  Besides being adorable, they're quick and easy to make, I promise!


Sunday, January 4, 2015

Simplicity 1244 and American Girl KIT

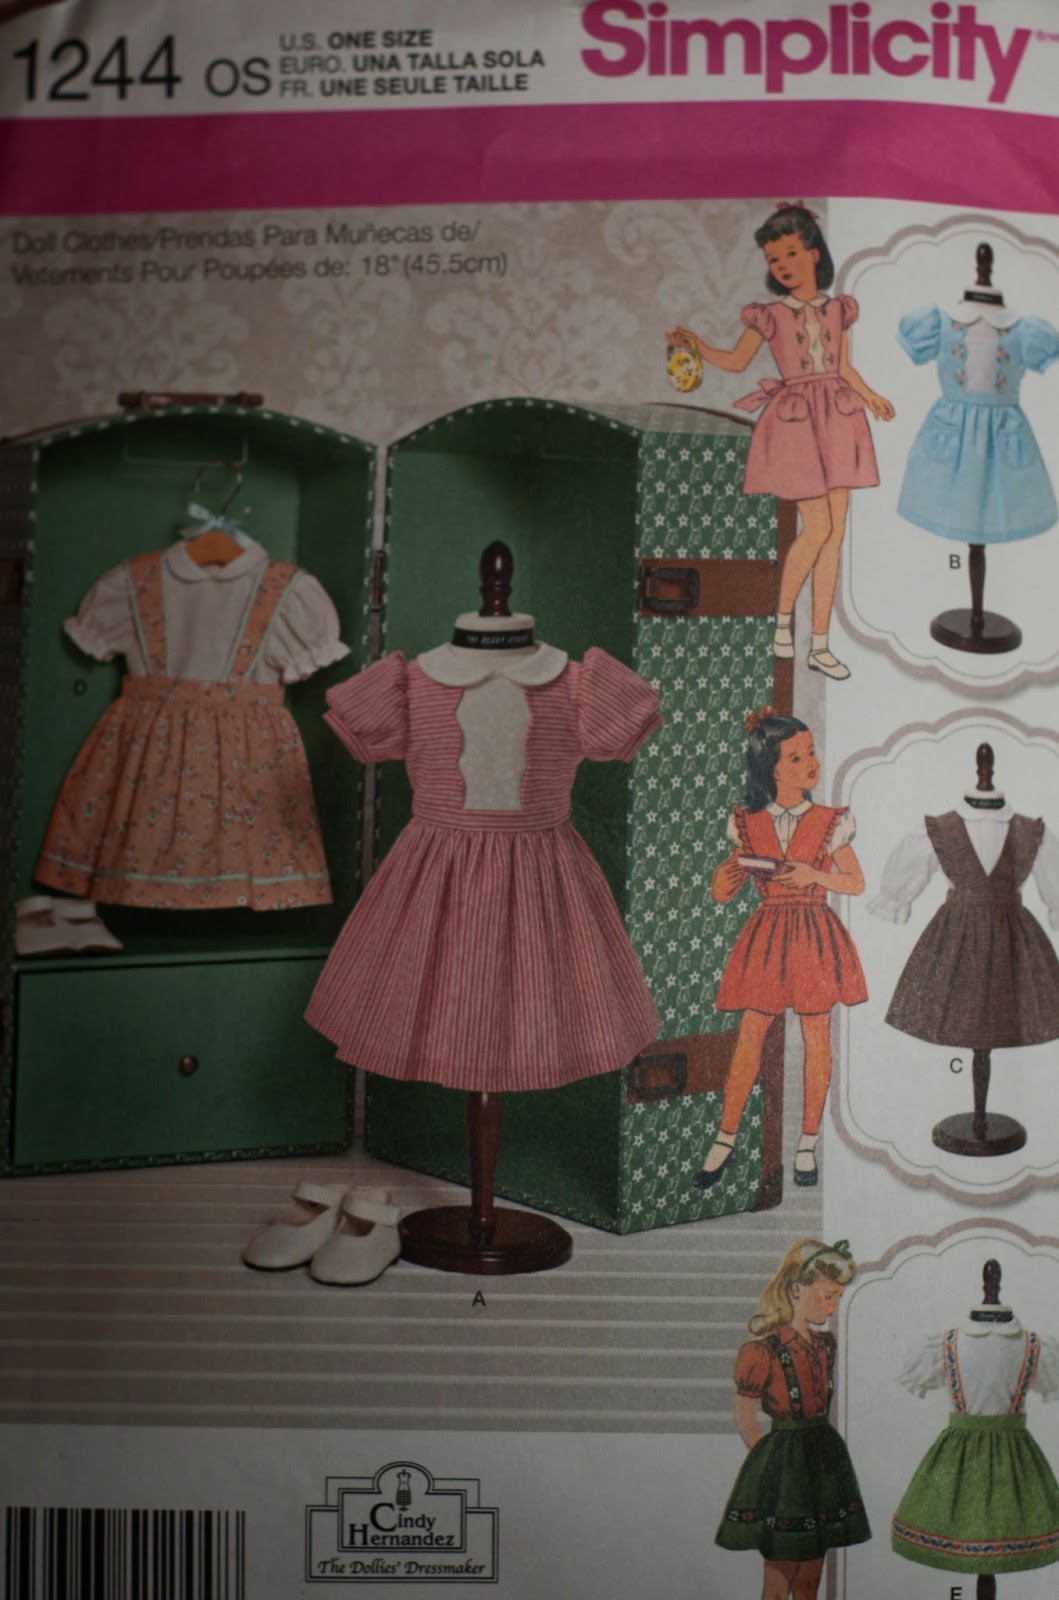
Today I finished up this pattern for the American Girl doll, Kit, that my daughter received for Christmas:
Simplicity 1244--I made view A, in the center.
 
I matched the sleeve cuffs to the center bodice fabric, and omitted the ties at the waist.
 
I also lined the bodice instead of using a neck facing or bias trim, because I think it just looks nicer with a lining.
 
The pattern also calls for the collars to come all the way around to the back and get sewed down into the back seam.  What???  Who ever heard of a peter pan collar doing that?  So I cut them shorter and rounded the back edges.  I also edged them with a darling piping.  The dress closes with snaps under decorative, yellow buttons.  I really don't like Velcro on doll clothing, so I rarely use it for my own dolls.  My favorite closures are buttons and buttonholes, but this wasn't possible since MY SEWING MACHINE BROKE on Christmas Eve.  Right in the middle of putting my son's quilt together.  Did I mention that already in my last post?  I can't remember.  It's really been quite traumatic.  I do have a back up machine, but it's older and doesn't have an automatic buttonholer.  So I am relegated to "making do" with snaps as fasteners until I get my machine back. 
 
Here is the waffle maker that I acquired along with Kit.  It is metal and porcelain and heavy and oh, so adorable.
 
Just look at the waffles inside!  They can be removed from the iron.
 
And how cute is the plug?  It looks so real that I had to convince my 5 year old that it could NOT be really plugged into an outlet. 
 
Part of the waffle maker set includes this porcelain plate along with another waffle and a dollop of whipped cream on top.  There are also two sprigs of Christmas greenery to use as decoration.  This entire set is just too cute.  Pleasant company really outdid themselves with some of their earlier accessories.
 
Here is Kit's typewriter.  The keys actually press down, and the little thingy (I don't know what it's called) that types the letters onto the paper actually works!  You can even move the carriage back and forth.  It doesn't actually print (there's no typewriter ribbon), but everything moves like a real typewriter would function.
 
The stationary set that goes along with the typewriter.  How stinkin' cute is that eraser???  I remember my mother using one of those when I was a child.
 
Kit's lunch pail set
 
Another adorable set.  The pail is metal, and all the little food pieces and napkin can be packed away inside.
 
Coconut!
 
This is the earliest version of Coconut.  He is heavy, kind of like a paperweight.  The first run of these pets was called "he".  A year later they were called "she" and also had a magnet added under their nose so they could hold a toy bone.  Mine does not have the magnet.  He also comes with his little pet bed and cushion.
 
A sweet friend from my doll club sold me her daughter's Kit doll and all the above mentioned accessories.  Her daughter received Kit the year she came out, back in 2000.  Kit was the first doll manufactured by Mattel once they took over Pleasant Co, so she was kind of a transitional doll.  The back of my Kit's neck is marked "Pleasant Company" in super tiny, raised, writing.  I'd never seen such tiny writing used on the American Girls before.  I would take a picture of it, but it's so hard to see in real life, that I don't think I could get a decent photo of it.
 
I had always wanted to add Kit to my collection.  I love her clothing, her accessories, and her cute, bobbed haircut.  By the way, her hair is super shiny and soft.  She has the shiniest, smoothest hair out of all my AG dolls.  Have you seen her kitchen stove and canning accessories?
1930's stove--I want this so bad!  It is a retired item, so the only way to obtain it is on the secondary market.
 
The produce and preserves set that goes along with the stove
 
Kit's wash day set--this would be so cute to set up on a shelf in my laundry room, don't you think?
 
I also love this Glassware and Linens set.  I have a weakness for tiny doll dishes and silverware.
 
Kit has so many wonderful accessories--hunting for them is so much fun.  Someday I hope to add these retired items to my (ahem, I mean my daughter's) Kit collection!