Maud Humphrey

Maud Humphrey

Tuesday, February 4, 2014

Gotz Abigail and How to Draft a Basic Doll Dress Bodice

Just look at this new sweetie that has come to live at my home...isn't she just adorable?
This is "Abigail", a limited edition, 22" doll produced by Gotz in 2008.
 
I recently discovered that Goodwill has an online auction site.  Oh, my.  As if I don't spend enough time on Ebay, now I have another site to haunt.  And this is where I happened to find Abigail.

Here she is, wearing her original outfit of a ballet costume.  This doll had never been removed from her box when I received her, so I was the first to free her lovely curls from a ponytail.
 
Isn't this profile adorable?
 
Of course, the first thing my daughter wanted to do was change her outfit, but since we mainly have 18" and smaller dolls, we didn't have anything that fit.  So what's a doll collector/seamstress to do?  First, let your 4 year old pick out the fabric.  Next, sew a dress!  Here is what I came up with:
Pretty cute, right?
 
It closes with real buttons.
 
Abigail looks pretty happy with the results, I think.
 
I thought I'd do a quick tutorial on how I go about drafting a simple bodice pattern.  I am by no means a professional, and there are probably other ways to do this, but this is what works for me.
 
First things first...grab a measuring tape, a ruler, a pencil, and some lined notebook paper.
Measure your doll around her waistline where you want the bottom edge of the bodice.  As you can see, Abigail's waist measurement was about 12".  Divide this number in half, which gives us 6".  I then add about 1/2" for ease, and another 1/2" for the seam allowances, which is gives us a total of 7".  Divide this number in half to get 3 1/2", since you are only going to draw half of the bodice front.  Now draw this line on your notebook paper like so:
 
Next, measure your doll from neckline to waist.  I got 3 1/4", to which I added 1/2" for seam allowances, making a total of 3 3/4". 
 
 
Draw this line on your paper, perpendicular to your first line, like so:
 
Measure your doll from armpit to waistline--I got 1 3/4". 
 
Add 1/2" for the seam allowances--I now have a measurement of 2 1/4".  Draw this line parallel to the other line you just drew, like so:
 
Measure over from the middle of your doll's neck to where you want her shoulder strap to begin.  In Abigail's case, this was approximately 1 1/2".  Subtract 1/4" for the seam allowance, giving you a total of 1 1/4" to measure over from the neckline.
 
Unfortunately, I don't have a photo of the next step...either I forgot to take it, or the camera deleted it.  But now you need to measure how far up the shoulder is from the neckline...about 1 1/4" for Abigail.  Add 1/4" seam allowance for a total of 1 1/2".    I also measured how wide I wanted her shoulder strap to be, which was 1". 
 Add to that another 1/2" for seam allowances, and draw the shoulder at an angle.  Take a close look at the following picture for how I drew these lines, and maybe it will make better sense:
 
The last line, the armhole curve, is the trickiest.  I don't have a magic formula for that...I simply freehand a curved line connecting the shoulder to the armpit.  It should look something like so:
You have now drawn half of the front bodice.  Place the left edge (marked "Fold") along the folded edge of your fabric.
 
I draw the back bodice the same way, only I add a bit more width to the piece to allow for overlap along the back edges.  The neckline is raised, and I also make the armhole curves smaller.  Here is a picture of the two finished pieces, side by side:
 
Before I cut my pieces out of good fabric, I make a mock-up out of paper towels and tape them together at shoulders and side seams.  I try this on the doll, and see if I need to make any adjustments.  This isn't a perfect science...sometimes I end up cutting three, four, or five patterns before I finally feel like the fit is right.  Other times, I luck out and get it right on the first try!
 
Here's one final look at the finished product.  I added a hem band in a contrasting fabric which is trimmed with ric rac.  The upper bodice is also done in the contrasting fabric and trimmed with ric rac, as well as cotton, eyelet lace.  I think I will make her another dress soon, but this time I will add sleeves.  This is such a fun dolly to sew for!  I would also love to make her a coat and bonnet, along with some cropped pants and a swing top.
 
I hope these directions weren't too confusing.  If you try this, let me know.  Have fun!


Wednesday, January 29, 2014

Our Visit to the American Girl Place!

 
Last week we traveled a couple of hours away to visit our son and daughter-in-law at their new home.  It just so happens that they are within 50 miles of an American Girl Place!
 
 
The place was HUGE!  Dolls in beautiful displays greeted us around every corner.
 
Sophie in front of the Rebecca doll display
 
Caroline!
 
Marie Grace and Cecile...I want the wash stand!
 
Sophie and I both loved Rebecca best, but choosing a favorite was so hard!  I do believe she will be the next AG to join our collection.
 
So many dolls...
 
Caroline and her dining table set...so pretty.
 
Sophie loves ballet, and had no inhibitions about striking a pose with the Isabelle cutout.
 
Here we are, in front of Kit and Ruthie's display.  I've always liked Kit, but I never really thought that much about Ruthie until I saw her in person.  My, she is beautiful!  And yes, we brought along our Nellie doll to share in the adventure.
 
The mall which housed the American Girl Place also has another one of our favorite stores nearby...the Disney Store!  This is the only picture I got with my daughter-in-law--she is almost full term and didn't want her picture taken.  I think she is beautiful!
 
Sophie wasted no time in finding the Princess dresses.
 
My girls, goofing around!
 
Be still my heart...Disney now offers replicas of the dolls from their "It's a Small World" ride.  It took all my willpower not to buy one.  (This time!)
 
And they sing!  Press their tummies, and they sing the iconic song in their sweet little accents.  Sophie and I both loved the little Japanese girl best. 
 
One of my favorite things about the Disney store is how it is decorated.  They spare no expense, and no detail is left out.  This store is a feast for the eyes.
 
How cute is this!?!
 
One last shot in front of the mall entrance to the store before heading home.  We were good girls and didn't buy anything.  Of course, had money not been an issue, it would have taken a moving van to bring everything home we would have liked to have purchased!  So this time we just window shopped.  But next time--and there WILL be a next time--money will be spent.  But how, oh how, will we ever decide on what?!?


New Sundress for my American Girl Molly

I am teaching another sewing class this Friday to some young ladies from our church.  One of the girls owns the following book, and asked if we could make one of the outfits:
 
It is a nice book with basic patterns to create 12 outfits, all made from fat quarters.
 
The girls decided that this is the outfit they wanted to make first:
 
I  rummaged through my stash and came up with two, sweet, vintage-looking prints that worked well together.
 
The only changes I made to the original pattern was to shorten the shoulder straps by one inch.  I also chose to make the bodice tie from the skirt fabric, instead of the bodice fabric.
 
I love the little details, like the button-trimmed pocket and the contrasting hem band.  The dress closes in back with two snaps.
 
I chose Molly to model this dress because the poor dear hasn't had any new clothes in ever so long!  I think the colors look lovely on her.  She looks happy, don't you think?
This is a pre-Mattel Molly, made by Pleasant Company.  I love these earlier dolls, because I think they have nicer wigs, longer and softer eyelashes, and slightly rounder faces.  Of course, I still like the current American Girls, too!  I keep trying to justify how I can go about adding Rebecca, Caroline, Marie Grace and Cecile to my collection...someday!


Tuesday, January 28, 2014

Karito Kids Lara Transformation!

I love haunting our local Goodwill.  It is only a couple of miles from our house, so I try to stop by at least 2-3 times a week, just to check out the toy aisle.  More often than not, I walk away empty handed.  But lately, I have found some awesome deals!  This is a doll I found on a recent visit, a Karito Kids Lara:
 
Only, she didn't look like this.
 
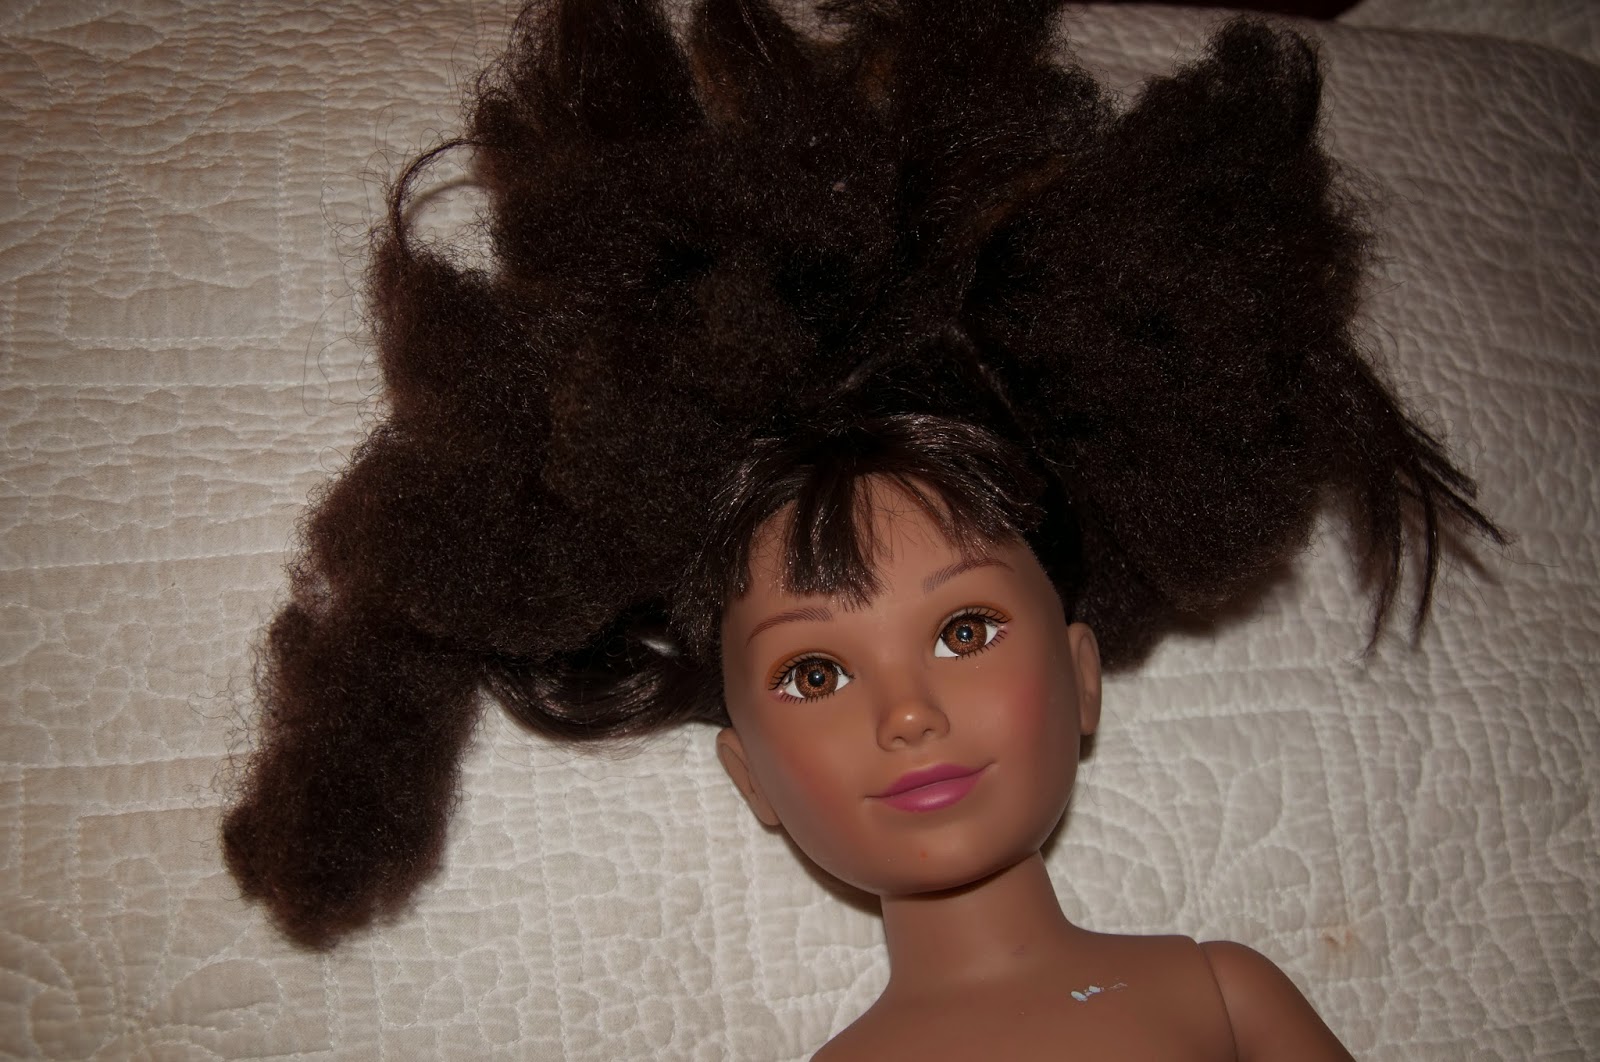
This is the poor, bedraggled orphan I found, carelessly tossed in among a heap of cast-off, plastic toys:
 
Yes, she had scary hair.  It was bad...REALLY bad.  Even the cashier commented on it.
 
My first thought was to leave her there.  After all, there was no possible way to salvage that mess of  a mane, was there?  But then I remembered how I had stumbled across a Karito Kid a couple of years ago at another Goodwill, and didn't purchase her.  By the time I had arrived home, I changed my mind and drove back to get her, but she was already gone.  I have never found another one since. Until now.   So I figured for $3.99, I should take my chances.  I bought her.
 
In case you are not familiar with Karito Kids, these were well made dolls first manufactured in 2007.  There were five dolls in the original production run, each representing a girl from a different country.  A sixth doll joined them a year or two later.  The original Karito Kids stand about 21" tall, with cloth torsos that are jointed like the American Girl dolls.  They also have a vinyl breast plate, like the Madame Alexander 18" play dolls.  Their eyes are stationary, and they had beautful wigs.  They originally retailed for $99 and were sold in higher-end toy shops and online.  The neat thing about these dolls was that a certain percent of each purchase went to a worldwide children's charity. By entering a unique code (found on every product) on the company website, one could select the charitable cause to which the donation would be directed.
 
A few years after the original dolls were introduced, the company created a cheaper version which would be sold at Walmart.  Two, new dolls joined the crowd:  Leza (a blond), and Lara (brunette).  I believe they retailed for around $35.  As far as I can tell, the only thing that really changed about them was their hair.  The two new dolls came with cheaper, rooted hair, instead of the nicer quality wigs of the original dolls.  Since these newer dolls could be sold for about 1/3 of the cost of their more expensive sisters, I guess they had to reduce the quality somewhere.  The manufacturer quit making these dolls shortly thereafter, and they are now only found on the secondary market.
 
Because my doll has brunette, rooted hair, I was quickly able to identify her as "Lara".  This is the back side of her head:
Quite the mess, huh?  At first, I thought I would simply cut it all off and replace it with a wig.  Then I decided to try and restore it.  I have successfully repaired other dolls' hair in the past, but none were ever as bad as this one.  Still, I figured, what could be the harm?  If I couldn't tame it, then I wouldn't feel bad about cutting it all off.
 
First things first--I gathered my supplies:
1) Bon Ami--a mild, powder abrasive which is great for removing marks from vinyl.  Some people also like to use "Mr. Clean Magic Erasers", but Bon Ami has always worked well for me, so that is what I use.
2) Downy liquid fabric softener--this is used to soften the hair.  I suppose you could buy an off-brand, but make sure it is unscented, unless you don't mind the heavily perfumed smell of the scented kind.
3)  A metal pet comb for detangling the hair.  You only want to use metal combs on doll hair because plastic bristles will snag the hair and cause it to frizz.  I picked up this comb at the dollar store.
4)  A hair straightener.  Make sure it can be set to a low-heat setting, and that it has ceramic plates.  I bought mine at Goodwill.
 
First, I washed this doll's hair with some liquid soap, but I have also used shampoo in the past.  I don't think it really matters; you are just trying to clean away the grime.  Did I mention how bad this doll's hair was?  It was basically just one, big, frizzy, matted mess. 
 
After giving it a quick wash, I filled a 2 quart container with the fabric softener (full strength), and submerged Lara's head so that most of her hair was covered:
 
She stayed like this on my kitchen counter for the next 24 hours.
 
I don't have pictures of what I did next.  After letting her hair soak, I rinsed it out really well with plain water until I felt that all the fabric softener had been rinsed clear.  By the way, you can save your fabric softener and reuse it for another doll.  Just pour it back into your container when you are through.
 
At this point, I grabbed the metal comb and a pair of scissors and made myself comfortable in front of the television.  2 1/2 hours later...yes, I said 2 1/2 hours--I had finally combed through all the hair.  I had to work with super small sections and cut off quite a bit of the length.  Even with the fabric softener, the hair was just too frizzy and matted to save at it's original length.
 
After the hair was combed out and trimmed, I started using the hair straightener, set on it's lowest setting.  Make sure the hair is damp if you attempt to do this.  It will seem scary at first, because the wet hair will sizzle, and you will think you are frying your doll's hair!  However, the water is protecting the hair, and the heat is actually melting all the stray, little fibers back together.  After the first few passes over Lara's hair, I was amazed at how much better it looked.  See for yourself:
 
Can  you even believe this is the same doll?  Yes, her hair is much shorter than I had originally planned.  But I started getting a little scissor happy, and, well, she ended up with a bob.  But I love it!
 
Back view:
 
Left side:
 
Right side:
 
Remember the Bon Ami mentioned above?  This is what I used it for:
 
Her arm is now good as new.
 
And because she was naked when I found her, I quickly set about making her a new outfit--a pretty sundress with a matching, removable apron:
 
The dress closes in back with real buttons.  I like these so much better than Velcro, which always snags doll hair.
 
So to recap...we went from this:
 
To this:
 
I honestly didn't think when I started this project that it would turn out so well!  I initially thought that I would simply rewig the doll so I could sell her, but now, I have rather fallen in love with her!  So she will be staying in my collection, at least for a little while.
 
Encouraged by this transformation, I now have another little waif waiting for her turn to become beautiful:
 
She is currently upside down in a bowl of Downy fabric softener as I type!